Hadoop and Spark Installation on Raspberry Pi-3 Cluster – Part-3
February 16, 2017 Leave a comment
In this part we will see the configuration of Master Node. Here are the steps
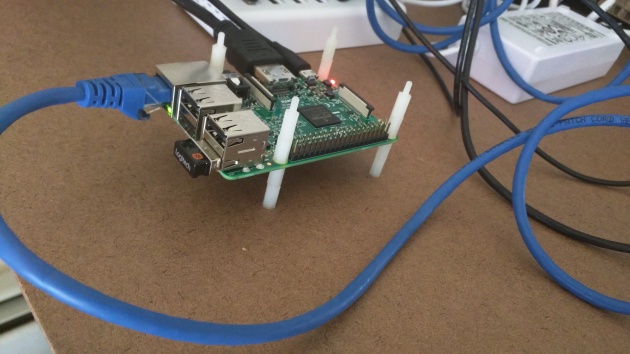
- Mount first Raspberry Pi-3 device on the nylon standoffs
- Load the image from part2 into a sd_card
- Insert the sd_card into one Raspberry Pi-3 (RPI) device
- Connect RPI to the keyboard via USB port
- Connect to monitor via HDMI cable
- Connect to Ethernet switch via ethernet port
- Connect to USB switch via micro usb slot
- DHCPD Configuration
- NAT Configuration
- DHCPD Verification
- Hadoop related changes on Master node
Here Steps1-7 are all physical and hence I am skipping them.

Step #8: dhcpd configuration
This node will serve as DHCP server or NAT server and overall controller of the cluster
- Goto “sudo raspi-config” -> Advanced Options -> HostName -> “rpi3-0” (make sure its rpi3-0 as its our first node)
- sudo apt-get install isc-dhcp-server
- sudo nano /etc/dhcp/dhcpd.conf
- Define subnet which will be the network that all the RPI-3 nodes connect to.
subnet 192.168.2.0 netmask 255.255.255.0 {
        range 192.168.2.100 192.168.2.200;
        option broadcast-address 192.168.2.255;
        option routers 192.168.2.1;
        max-lease-time 7200;
        option domain-name "rpi3";
        option domain-name-servers 8.8.8.8;
}
- Adjust server configuration
- sudo nano /etc/default/isc-dhcp-server
- Tell which interface to use at last line. (“eth0”)
# On what interfaces should the DHCP server (dhcpd) serve DHCP requests?
#       Separate multiple interfaces with spaces, e.g. "eth0 eth1".
INTERFACES="eth0"
- sudo nano /etc/network/interfaces
- Make the below changes and reboot the PI
auto eth0
iface eth0 inet static
	address 192.168.2.1
	netmask 255.255.255.0
Step #9: NAT configuration
- Now we will configure IP tables to provide Network Address Translation services on our master node rpi3-0
- sudo nano /etc/sysctl.conf
- uncomment “net.ipv4.ip_forward=1”
- sudo sh -c “echo 1 > /proc/sys/net/ipv4/ip_forward”
- Now it has been activated, run below 3 commands to configure IP Tables correctly
sudo iptables -t nat -A POSTROUTING -o wlan0 -j MASQUERADE
sudo iptables -A FORWARD -i wlan0 -o eth0 -m state --state RELATED
sudo iptables -A FORWARD -i eth0 -o wlan0 -j ACCEPT
- Make sure we have this setup correct
- sudo iptables -t nat -S
- sudo iptables -S
- In order to avoid loosing this config upon reboot, do
- sudo sh -c “iptables-save > /etc/iptables.ipv4.nat” (save iptables configuration to a file)
- sudo nano /etc/network/interfaces (add below line to interfaces file)
post-up iptables-restore < /etc/iptables.ipv4.nat
auto eth0
iface eth0 inet static
	address 192.168.2.1
	netmask 255.255.255.0
	post-up iptables-restore  < /etc/iptables.ipv4.nat
Step #10: Verify dhcpd
- To see the address that has been assigned to the new PI
- cat /var/lib/dhcp/dhcpd.leases
- This would also give us the MAC address of the newly added node
- It is always handy to have the dhcp server assign fixed addresses to each node in the cluster so that its easy to remember the node by ipaddress. For instance next node in the cluster is rpi3-1 and it would be helpful to have a ip 192.168.2.101. To do this modify dhcp server config file
- sudo nano /etc/dhcp/dhcpd.conf
host rpi3-1 { hardware ethernet MAC_ADDRESS; fixed-address 192.168.2.101; }- Eventually this file will have a entry to all the nodes in the cluster
- Now we can ssh into the new node via IP Address
Step #11: Hadoop Related Configuration
- Setup SSH
su hduser
cd ~
mkdir .ssh
ssh-keygen
cat ~/.ssh/id_rsa.pub >> ~/.ssh/authorized_keys
chmod 0750 ~/.ssh/authorized_keys
// Lets say we added new slave node rpi3-1, then copy the ssh id to the slave node which will enable passwordless login
ssh-copy-id hduser@rpi3-1 (Repeat for each slave node)
ssh hduser@rpi3-1
- Setup HDFS
sudo mkdir -p /hdfs/tmp
sudo chown hduser:hadoop /hdfs/tmp
chmod 750 /hdfs/tmp
hdfs namenode -format
- Edit master and slave config files
- sudo nano /opt/hadoop-2.7.3/etc/hadoop/masters
rpi3-0
- sudo nano /opt/hadoop-2.7.3/etc/hadoop/slaves
rpi3-0
rpi3-1
rpi3-2
rpi3-3
- Update /etc/hosts file
127.0.0.1	localhost
192.168.2.1	rpi3-0
192.168.2.101	rpi3-1
192.168.2.102	rpi3-2
192.168.2.103	rpi3-3
References:
https://learn.adafruit.com/setting-up-a-raspberry-pi-as-a-wifi-access-point/install-software
Recent Comments