Spark Architecture

Spark can be launched in different modes and each of this mode has different architecture.

  1. Local: Single JVM
  2. Standalone: from datastax (Static Allocation)
  3. YARN: from Hadoop (Dynamic Allocation)
  4. Mesos: Spark’s own Arch (Dynamic Allocation)

In these, 2,3,4 are distributed architectures. Standalone and Mesos architectures are similar to that of YARN.

https://tekmarathon.com/2017/02/13/hadoop-2-x-architecture/

In YARN, there are two different modes

  • Spark YARN Client Mode Architecture: This is for Spark in Scala/Python shell (aka Interactive Mode). Here Spark Driver will be run in the Edge Node and if the Driver Program is killed or edge node crashes, the application gets killed.
  • Spark YARN Cluster Mode Architecture: This is when user submits spark application using spark-submit. Here the Spark Driver is initiated inside the Application Master.

Unlike Hadoop Driver Program, Spark Driver is also responsible for

  • DAG Scheduler and Task Scheduler: Once Executors are launched inside Containers, they will have direct communication with this Scheduler. This play far more important role than that of the YARN Scheduler in Spark Applications.
  • Spark UI: UI with application DAG, Jobs and Stages are all served by the Spark Driver.

Spark Terminology – Nodes, Containers, Executors, Cores/Slots, Tasks, Partitions, Jobs, Stages

  • Spark cluster can be formed with ‘n’ Nodes.
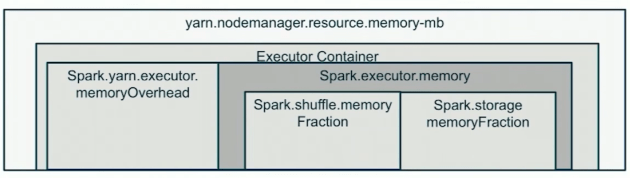
  • Each Node can have 1+ containers. Number of containers are decided based on the min and max container memory limits in yarn-site.xml.
  • Each Container must have exactly 1 Executor JVM.
  • Each Executor can have 1+ Slots (aka Cores). The minimum slots required for Spark application are 2. Recommended range is between 8-32. We can choose a maximum of 2-3x times actual physical cores on a node.
  • Tasks are run inside the Slots.Task is a unit of work assigned to Executor core/slot by the Task Scheduler.
  • Partition is a block of data(like blocks in HDFS file). Spark RDD is split into 1+ partitions. Each Partition requires one thread of computation (aka Task) and hence an RDD with ‘n’ partitions requires ‘n’ Tasks to perform any Transformation.
  • Jobs: A Spark Application is split into ‘n’ Jobs based on number of Actions inside it. Basically for every Action a Job will be launched.
  • Stages: A Job is divided into ‘m’ Stages. A Stage is a group that can be put together based on operations, for example: map() and filter() can put together into a stage. And this Stage is finally split into ‘n’ Tasks.

Dynamic Allocation in Spark

Dynamic Allocation is a spark feature that allows addition or removal of executors launched by the application dynamically to match the workload.

Unlike static allocation of resources (prior to 1.6.0) where spark used to reserve fixed amount of CPU and Memory resources, in Dynamic Allocation its purely based on the workload.

Note: This is the main difference between Spark Standalone Architecture (static allocation) and Spark YARN/Mesos Architecture.

 
// flag to enable/diable DA feature
spark.dynamicAllocation.enabled: true/false

// Application starts with this many executors
spark.dynamicAllocation.minExecutors: m

// Application can increase to this many executors at max
spark.dynamicAllocation.maxExecutors: n

// For the FIRST Time when this time is hit, number of executors 
// will be increased
spark.dynamicAllocation.sustainedSchedulerBacklogTimeout: x secs

// Next Time onwards, whenever this time is hit, it increases 
// number of executors till maxExecutors is hit
spark.dynamicAllocation.schedulerBacklogTimeout: y secs

// It releases the executor when it sees no Task is scheduled 
// on Executor for this time
spark.dynamicAllocation.executorIdleTimeout: z secs

There were few issues with dynamic allocation in Streaming Applications because

  • Executors may never be idle as they run for every N secs
  • Receiver will be running on a Slot/Core inside Executor which is never finished and hence idleTimeout will never be hit

https://issues.apache.org/jira/browse/SPARK-12133

 
// For streaming applications, disable above switch and enable below one
spark.streaming.dynamicAllocation.enabled

Tuning Spark Applications

Tuning performance of  Spark Applications can be done at various stages

  • OS Level
  • JVM Level
  • YARN Level
  • Spark Level

OS Level
In yarn-site.xml, we can allocate physical and virtual memory for a container initialized the node.
https://tekmarathon.com/2017/02/13/important-yarn-configuration-properties/

JVM Level
We can look at the performance of the JVM Garbage Collection and then fine tune GC parameters
./bin/spark-submit –name “My app” –master yarn –conf spark.eventLog.enabled=false –conf “spark.executor.extraJavaOptions=-XX:OldSize=100M -XX:MaxNewSize=100M -XX:+PrintGCDetails -XX:+PrintGCTimeStamps” myApp.jar
http://www.oracle.com/technetwork/java/javase/tech/vmoptions-jsp-140102.html

YARN Level
While submitting the job, we can control
Number of executors (Executor is run inside container and 1 Executor per Container)
Memory for each executor
Number of cores for each executor (This value can be raised to a maximum of 2x times the actual cores, but beaware that it can also raise the bar for memory)
Memory Overhead
./bin/spark-submit –name “My app” –master yarn –num-executors 8 –executor-memory 4G –executor-cores 16 –conf “spark.yarn.executor.memoryOverhead=1024M” myApp.jar
https://hadoop.apache.org/docs/r2.7.1/hadoop-yarn/hadoop-yarn-common/yarn-default.xml

Spark Level
Prior to Spark 1.6.0, executor memory (spark.executor.memory) was split into two different pools
Storage Memory: Where it caches RDDs
Execution Memory: Where it holds execution objects
From 1.6.0 onwards, they are combined into a unified pool and there is no hard line split between the two. It is dynamically decided at run time on ratio of memory allocation for these two pools.

memory_allocation
https://0x0fff.com/spark-memory-management/

Based on all the above factors, we should target tuning the memory settings based on

  • Objectives (EFFICIENCY vs RELIABILITY) and
  •  Workloads (whether its a BATCH/STREAMING)


spark_mem_mgmt

Some TIPS:

    • Cost of garbage collection is directly proportional to the number of objects hence try to reduce number of objects (for example use Array(int) instead of List)
    • For Batch Applications use default GC (ParallelGC) and for Streaming Applications use ConcMarkSweepGC
// BATCH Apps: default GC
-XX:+UseParallelGC -XX:ParallelGCThreads=<#>

// Streaming Apps
-XX:+UseConcMarkSweepGC -XX:ParallelCMSThreads=<#>
OR
// G1 GC Available from Java7, which is considered as good replacement to CMS
--XX:+UseG1GC
    • KRYO Serialization: This is 10x times faster than Java Serialization. In general, for 1G disk file, it takes 2-3G to store it into memory which is is the cost of Java Serialization.
conf.set("spark.serializer", "org.apache.spark.serializer.KyroSer");
// We need to register our custom classes with KYRO Serializer
  • TACHYON: Use tachyon for off-heap storage. The advantage is that even if the Executor JVM crashes, it stays in the OFF_HEAP storage.
 

References:
https://www.youtube.com/watch?v=dTR30Fy02Yo&t=19s

Hadoop and Spark Installation on Raspberry Pi-3 Cluster – Part-4

In this part we will see the configuration of Slave Node. Here are the steps

  1. Mount second Raspberry Pi-3 device on the nylon standoffs (on top of Master Node)
  2. Load the image from part2 into a sd_card
  3. Insert the sd_card into one Raspberry Pi-3 (RPI) device
  4. Connect RPI to the keyboard via USB port
  5. Connect to monitor via HDMI cable
  6. Connect to Ethernet switch via ethernet port
  7. Connect to USB switch via micro usb slot
  8. Hadoop related changes on Slave node

Here Steps1-7 are all physical and hence I am skipping them.

Once the device is powered on, login via external keyboard and monitor and change the hostname from rpi3-0 (which comes from base image) to rpi3-1

Step #8: Hadoop Related Configuration


  • Setup HDFS
 
sudo mkdir -p /hdfs/tmp  
sudo chown hduser:hadoop /hdfs/tmp  
chmod 750 /hdfs/tmp  
hdfs namenode -format
  • Update /etc/hosts file
 
127.0.0.1	localhost
192.168.2.1	rpi3-0
192.168.2.101	rpi3-1
192.168.2.102	rpi3-2
192.168.2.103	rpi3-3
  • Repeat the above steps for each of the slave node. And for every addition of slave node, ensure
  • ssh is setup from master node to slave node
  • slaves file on master is updated
  • /etc/hosts file on both master and slave is updated

Start the hadoop/spark cluster


    • Start dfs and yarn services
 
cd /opt/hadoop-2.7.3/sbin 
start-dfs.sh 
start-yarn.sh 
    • On master node “jps” should show following
 
hduser@rpi3-0:~ $ jps
20421 ResourceManager
20526 NodeManager
19947 NameNode
20219 SecondaryNameNode
24555 Jps
20050 DataNode
    • On Slave Node “jps” should show following processes
 
hduser@rpi3-3:/opt/hadoop-2.7.3/logs $ jps
2294 NodeManager
2159 DataNode
2411 Jps
    • To verify the successful installation, run a hadoop and spark job in cluster mode and you will see the Application Master tracking URL.
    • Run spark Job
      • spark-submit –class com.learning.spark.SparkWordCount –master yarn –executor-memory 512m ~/word_count-0.0.1-SNAPSHOT.jar /ntallapa/word_count/text 2
    • Run example mapreduce job
      • hadoop jar /opt/hadoop-2.7.3/share/hadoop/mapreduce/hadoop-mapreduce-examples-2.7.3.jar wordcount /ntallapa/word_count/text /ntallapa/word_count/output

Hadoop and Spark Installation on Raspberry Pi-3 Cluster – Part-3

In this part we will see the configuration of Master Node. Here are the steps

  1. Mount first Raspberry Pi-3 device on the nylon standoffs
  2. Load the image from part2 into a sd_card
  3. Insert the sd_card into one Raspberry Pi-3 (RPI) device
  4. Connect RPI to the keyboard via USB port
  5. Connect to monitor via HDMI cable
  6. Connect to Ethernet switch via ethernet port
  7. Connect to USB switch via micro usb slot
  8. DHCPD Configuration
  9. NAT Configuration
  10. DHCPD Verification
  11. Hadoop related changes on Master node

Here Steps1-7 are all physical and hence I am skipping them.
master_node

Step #8: dhcpd configuration


This node will serve as DHCP server or NAT server and overall controller of the cluster

    • Goto “sudo raspi-config” -> Advanced Options -> HostName -> “rpi3-0” (make sure its rpi3-0 as its our first node)
    • sudo apt-get install isc-dhcp-server
    • sudo nano /etc/dhcp/dhcpd.conf
    • Define subnet which will be the network that all the RPI-3 nodes connect to.
 
subnet 192.168.2.0 netmask 255.255.255.0 {
        range 192.168.2.100 192.168.2.200;
        option broadcast-address 192.168.2.255;
        option routers 192.168.2.1;
        max-lease-time 7200;
        option domain-name "rpi3";
        option domain-name-servers 8.8.8.8;
}
  • Adjust server configuration
  • sudo nano /etc/default/isc-dhcp-server
  • Tell which interface to use at last line. (“eth0”)
  •  
    # On what interfaces should the DHCP server (dhcpd) serve DHCP requests?
    #       Separate multiple interfaces with spaces, e.g. "eth0 eth1".
    INTERFACES="eth0"
    
    
  • Configure the interfaces file of rpi3-0 in order to be served as dhcp server and nat server for the rest of the pi cluster
    • sudo nano /etc/network/interfaces
    • Make the below changes and reboot the PI
    •  
      auto eth0
      iface eth0 inet static
      	address 192.168.2.1
      	netmask 255.255.255.0
      

Step #9: NAT configuration


    • Now we will configure IP tables to provide Network Address Translation services on our master node rpi3-0
    • sudo nano /etc/sysctl.conf
    • uncomment “net.ipv4.ip_forward=1”
    • sudo sh -c “echo 1 > /proc/sys/net/ipv4/ip_forward”
    • Now it has been activated, run below 3 commands to configure IP Tables correctly
 
sudo iptables -t nat -A POSTROUTING -o wlan0 -j MASQUERADE
sudo iptables -A FORWARD -i wlan0 -o eth0 -m state --state RELATED
sudo iptables -A FORWARD -i eth0 -o wlan0 -j ACCEPT
  • Make sure we have this setup correct
  • sudo iptables -t nat -S
  • sudo iptables -S
  • In order to avoid loosing this config upon reboot, do
    • sudo sh -c “iptables-save > /etc/iptables.ipv4.nat” (save iptables configuration to a file)
    • sudo nano /etc/network/interfaces (add below line to interfaces file)
      post-up iptables-restore < /etc/iptables.ipv4.nat
 
auto eth0
iface eth0 inet static
	address 192.168.2.1
	netmask 255.255.255.0
	post-up iptables-restore  < /etc/iptables.ipv4.nat

Step #10: Verify dhcpd

  • To see the address that has been assigned to the new PI
  • cat /var/lib/dhcp/dhcpd.leases
  • This would also give us the MAC address of the newly added node
  • It is always handy to have the dhcp server assign fixed addresses to each node in the cluster so that its easy to remember the node by ipaddress. For instance next node in the cluster is rpi3-1 and it would be helpful to have a ip 192.168.2.101. To do this modify dhcp server config file
      • sudo nano /etc/dhcp/dhcpd.conf
     
    host rpi3-1 {
        hardware ethernet MAC_ADDRESS;
        fixed-address 192.168.2.101;
    }
    
    • Eventually this file will have a entry to all the nodes in the cluster
    • Now we can ssh into the new node via IP Address

Step #11: Hadoop Related Configuration


    • Setup SSH
 
su hduser 
cd ~  
mkdir .ssh  
ssh-keygen  
cat ~/.ssh/id_rsa.pub >> ~/.ssh/authorized_keys  
chmod 0750 ~/.ssh/authorized_keys  
// Lets say we added new slave node rpi3-1, then copy the ssh id to the slave node which will enable passwordless login
ssh-copy-id hduser@rpi3-1 (Repeat for each slave node)  
ssh hduser@rpi3-1
    • Setup HDFS
 
sudo mkdir -p /hdfs/tmp  
sudo chown hduser:hadoop /hdfs/tmp  
chmod 750 /hdfs/tmp  
hdfs namenode -format
    • Edit master and slave config files
        • sudo nano /opt/hadoop-2.7.3/etc/hadoop/masters
       
      rpi3-0
      
        • sudo nano /opt/hadoop-2.7.3/etc/hadoop/slaves
       
      rpi3-0
      rpi3-1
      rpi3-2
      rpi3-3
      
    • Update /etc/hosts file
 
127.0.0.1	localhost
192.168.2.1	rpi3-0
192.168.2.101	rpi3-1
192.168.2.102	rpi3-2
192.168.2.103	rpi3-3

References:
https://learn.adafruit.com/setting-up-a-raspberry-pi-as-a-wifi-access-point/install-software

Hadoop and Spark Installation on Raspberry Pi-3 Cluster – Part-2

Cluster Architecture

  • Master Node will be connected to home router via WiFi
  • Master Node to Slave Node connection will be established through Ethernet switch via Ethernet Cables
  • From my MAC (which will be on my home network), I will be able to SSH to the master node and then control the whole cluster

For Spark/Hadoop Cluster, there are few more TODOs that we need to take care of

  • Update /etc/hosts on every node (master and slave) with hostname and ip_address of every other node
  • Use same super user and group to do all installations on every node
  • Enable SSH on every node and establish passwordless SSH communication from Master to every Slave node.
  • Install zip/unzip and java on every node.

In this part we will see SINGLE NODE SETUP. I will be using MAC to perform all these steps.

Step #1: Load Raspbian Pi image onto the MicroSD Card

  • Download SD Formatter from https://www.sdcard.org/downloads/formatter_4/eula_mac/index.html
  • Format the disk (follow steps from google)
  • Download the Raspbian_Lite OS from https://www.raspberrypi.org/ and follow these instructions
    • diskutil list (this will list the newly added disk in my case it was /dev/disk4)
    • diskutil unmountDisk /dev/disk4
    • sudo dd bs=1m if=~/Downloads/2017-01-11-raspbian-jessie-lite.img of=/dev/rdisk4

Step #2: Configure the PI, connect to WiFi and upgrade all latest patches.

  • sudo raspi-config
    • Change pwd
    • Localization options (change locale to us_en, timezone to US-Eastern and wifi country to US)
    • Advanced Options – Mem Split from 64 to 16(becos of rasbian_lite OS will take very less footprint and it does not have any UI)
    • Interfacing Options – Enable SSH
  • sudo vi /etc/network/interfaces
    • Ethernet eth0 is the wired connection which we will be using
    • wlan0 is the wifi adapter on the board: Configure wifi so that we can use wifi to get updates on the Raspbian Lite OS
    • change manual to dhcp => this tells the interface that we get the settings via dhcp AND add SSID and PWD of home router
      • change the line “iface wlan0 inet manual” to
 
iface wlan0 inet dhcp
    wpa-ssid "SSID/NETWORK_NAME"
    wpa-psk "PASSWORD"
 
  •  Reboot the interface
    • sudo ifdown wlan0
    • sudo ifup wlan0
  • Now Raspberry PI is connected to WIFI
  • Update and Upgrade the Raspberry PI
    • sudo apt-get update
    • sudo apt-get upgrade

Step #3: Create separate superuser and group

  • We will use this user and group for all our core installations and configuration changes on all nodes
 
sudo addgroup hadoop
sudo adduser --ingroup hadoop hduser
sudo adduser hduser sudo
su hduser
 

Step #4: Download and Install REQUIRED SOFTWARES

  • Download and install zip utility
    • sudo apt-get install zip unzip
  • Download and install java
    • sudo apt-get install oracle-java7-jdk
  • Download, install and configure Spark
wget http://d3kbcqa49mib13.cloudfront.net/spark-2.1.0-bin-hadoop2.7.tgz
    sudo tar -xvzf spark-2.1.0-bin-hadoop2.7.tgz -C /opt/
    sudo chown -R hduser /opt/spark-2.1.0-bin-hadoop2.7
    source ~/.bashrc
    cp $SPARK_HOME/conf/spark-env.sh.template $SPARK_HOME/conf/spark-env.sh  
        SPARK_MASTER_IP=192.168.2.1
        SPARK_WORKER_MEMORY=512m
  • Download, install and configure Hadoop
    wget http://apache.osuosl.org/hadoop/common/hadoop-2.7.3/hadoop-2.7.3.tar.gz
    sudo mkdir /opt
    cd ~
    sudo tar -xvzf hadoop-2.7.1.tar.gz -C /opt/
    cd /opt
    sudo chown -R hduser:hadoop hadoop-2.7.1/
    sudo nano /opt/hadoop-2.7.3/etc/hadoop/
    export JAVA_HOME=/usr/lib/jvm/jdk-7-oracle-arm-vfp-hflt/jre
    
  • sudo nano /opt/hadoop-2.7.3/etc/hadoop/hdfs-site.xml
     
            <property>
                    <name>dfs.replication</name>
                    <value>1</value>
            </property>
    
  • sudo nano /opt/hadoop-2.7.3/etc/hadoop/core-site.xml
     
            <property>
                    <name>fs.default.name</name>
                    <value>hdfs://rpi3-0:54310</value>
            </property>
            <property>
                    <name>hadoop.tmp.dir</name>
                    <value>/hdfs/tmp</value>
            </property>
    
  • sudo nano /opt/hadoop-2.7.3/etc/hadoop/mapred-site.xml
     
      <property>
        <name>mapreduce.framework.name</name>
        <value>yarn</value>
      </property>
      <property>
        <name>mapreduce.map.memory.mb</name>
        <value>256</value>
      </property>
      <property>
        <name>mapreduce.map.java.opts</name>
        <value>-Xmx204m</value>
      </property>
      <property>
        <name>mapreduce.reduce.memory.mb</name>
        <value>102</value>
      </property>
      <property>
        <name>mapreduce.reduce.java.opts</name>
        <value>-Xmx102m</value>
      </property>
      <property>
        <name>yarn.app.mapreduce.am.resource.mb</name>
        <value>128</value>
      </property>
      <property>
        <name>yarn.app.mapreduce.am.command-opts</name>
        <value>-Xmx102m</value>
      </property>
    
  • sudo nano /opt/hadoop-2.7.3/etc/hadoop/yarn-site.xml
     
            <property>
                    <name>yarn.resourcemanager.resource-tracker.address</name>
                    <value>rpi3-0:8025</value>
            </property>
            <property>
                    <name>yarn.resourcemanager.scheduler.address</name>
                    <value>rpi3-0:8030</value>
            </property>
            <property>
                    <name>yarn.resourcemanager.address</name>
                    <value>rpi3-0:8050</value>
            </property>
            <property>
                    <name>yarn.nodemanager.aux-services</name>
                    <value>mapreduce_shuffle</value>
            </property>
            <property>
                    <name>yarn.nodemanager.resource.cpu-vcores</name>
                    <value>4</value>
            </property>
            <property>
                    <name>yarn.nodemanager.resource.memory-mb</name>
                    <value>1024</value>
            </property>
            <property>
                    <name>yarn.scheduler.minimum-allocation-mb</name>
                    <value>128</value>
            </property>
            <property>
                    <name>yarn.scheduler.maximum-allocation-mb</name>
                    <value>1024</value>
            </property>
            <property>
                    <name>yarn.scheduler.minimum-allocation-vcores</name>
                    <value>1</value>
            </property>
            <property>
                    <name>yarn.scheduler.maximum-allocation-vcores</name>
                    <value>4</value>
            </property>
            <property>
                    <name>yarn.nodemanager.vmem-check-enabled</name>
                    <value>false</value>
            </property>
            <property>
                    <name>yarn.nodemanager.pmem-check-enabled</name>
                    <value>true</value>
            </property>
            <property>
                    <name>yarn.nodemanager.vmem-pmem-ratio</name>
                    <value>4</value>
            </property>
    
  • Add environment variables to the bashrc file
    sudo nano ~/.bashrc

    export JAVA_HOME=/usr/lib/jvm/jdk-7-oracle-arm-vfp-hflt/jre
    export HADOOP_HOME=/opt/hadoop-2.7.3
    export HADOOP_MAPRED_HOME=$HADOOP_HOME
    export HADOOP_COMMON_HOME=$HADOOP_HOME
    export HADOOP_HDFS_HOME=$HADOOP_HOME
    export YARN_HOME=$HADOOP_HOME
    export HADOOP_COMMON_LIB_NATIVE_DIR=$HADOOP_HOME/lib/native
    export HADOOP_CONF_DIR=$HADOOP_HOME/etc/hadoop
    export YARN_CONF_DIR=$HADOOP_HOME/etc/hadoop
    export PATH=$PATH:$HADOOP_HOME/bin:$HADOOP_HOME/sbin
    
    export SPARK_HOME=/opt/spark-2.1.0-bin-hadoop2.7 
    export PATH=$PATH:$SPARK_HOME/bin  
    

Step #5: Create image from SD Card and clone it to all other PIs on the cluster

  • Switch off the Raspberry Pi-3 and take the sd-card out and plug it into mac
  • Run the below commands
    • diskutil list
    • sudo dd if=/dev/disk4 of=~/Downloads/raspberrypi_base_with_hdp.dmg
  • On other nodes
    • diskutil unmountDisk /dev/disk4
    • sudo dd bs=1m if=~/Downloads/raspberrypi_base_with_hdp.dmg of=/dev/rdisk4

References:
https://hadoop.apache.org/docs/stable/hadoop-project-dist/hadoop-common/SingleCluster.html
https://dqydj.com/raspberry-pi-hadoop-cluster-apache-spark-yarn/

Hadoop and Spark Installation on Raspberry Pi-3 Cluster – Part-1

In this part we will go through the hardware configurations of the Raspberyy PI-3 4 Node Cluster setup.

Hardware Configuration


raspi3


  1. Raspberry Pi 3 Model B 2016 Single Board Computer – 4 = 120 (bought from Microcentre)


sd_card


2. Samsung EVO 32GB Class 10 Micro SDHC Card with Adapter (MB-MP32DA/AM) – 4 (12) = $48


ethernet_cables


3. Cable Matters 8-Pack, Cat5E Snagless Ethernet Patch Cable in Blue 3 Feet – 4 = $10


8port_ethernet_switch


4. TRENDnet 8-Port Unmanaged 10/100 Mbps GREENnet Ethernet Desktop Plastic Housing Switch,TE100-S8 – 1 = $15


usb_cables


5. Anker [4-Pack] PowerLine Micro USB (1ft) – 1 = $10


usb2typem_cable


6. StarTech.com USB2TYPEM 3 Feet USB to Type M Barrel 5V DC Power Cable – 1 = $4


nylon_standoffs


7. 100 Pcs M2.5 x 10mm + 6mm PC Board Hexagonal Hex Threaded Spacer – 1 = $14


usb_switch8. ORICO DUB-10P-WH 96W 10 Ports Family-Sized Smart Super USB Charger with 10 × 5V 2.4A Port – White – 1 = $20


machine_screws


9. Machine Screws (bought from Home Depot) – 2 = under $2


10. Thin card board from Home Depot – $4

Total Budget under $250

Except Machine Screws, Card Board and RaspberryPis all above things are bought in Amazon and NewEgg.

Additionally you can buy heat sinks and fans based on the load and extent you are going to use this cluster.

My personal cluster setup Steps:

  • Drill 4 holes on to the card board as per the holes available on the Raspberry Pi
  • Stack two nylon standoffs together form 20 such sets
  • Insert screws from below the cardboard and 4 stacked nylon standoffs from above the cardboard
  • Keep stacking Raspberry Pis (RPIs) one by one and tighten the standoffs.
  • Connect 4 micro USB cables from RPIs to the USB switch
  • Connect 4 ethernet cables from RPIs to the Ethernet switch
  • Connect Ethernet switch to the USB switch via USB2TYPEM cable.
  • Insert 32G samsung sd card into each of the RPIs
  • Switch on the USB switch and the entire cluster will be powered.

cluster_1 cluster_2


Important YARN configuration properties

To configure YARN and MapReduce on top of YARN, we should look into couple of configuration files

  • yarn-site.xml
  • mapred-site.xml

yarn-site.xml

  • yarn.scheduler.minimum-allocation-mb: The minimum allocation for every container request at the RM
  • yarn.scheduler.maximum-allocation-mb: The maximum allocation for every container request at the RM
  • yarn.scheduler.minimum-allocation-vcores: The minimum allocation for every container request at the RM, in terms of virtual CPU cores.
  • yarn.scheduler.maximum-allocation-vcores: The maximum allocation for every container request at the RM, in terms of virtual CPU cores.
  • yarn.nodemanager.resource.memory-mb: Amount of physical memory, that can be allocated for containers. Total RAM on a given node that can be utilized by the node manager to create the containers
  • yarn.nodemanager.resource.cpu-vcores: Number of vcores that can be allocated for containers. This is used by the RM scheduler when allocating resources for containers. This is not used to limit the number of physical cores used by YARN containers.
  • yarn.nodemanager.pmem-check-enabled: Whether physical memory limits will be enforced for containers.
  • yarn.nodemanager.vmem-check-enabled: Whether virtual memory limits will be enforced for containers.
  • yarn.nodemanager.vmem-pmem-ratio: Ratio between virtual memory to physical memory when setting memory limits for containers. Container allocations are expressed in terms of physical memory, and virtual memory usage is allowed to exceed this allocation by this ratio.

Virtual Memory: physical + paged memory

Reference:
https://hadoop.apache.org/docs/r2.7.1/hadoop-yarn/hadoop-yarn-common/yarn-default.xml
http://hortonworks.com/blog/how-to-plan-and-configure-yarn-in-hdp-2-0/

mapred-site.xml

  • mapreduce.framework.name: yarn
  • mapreduce.map.memory.mb: The amount of memory to request from the YARN scheduler for each map task. This is total physical RAM of a Map Task Container.
  • mapreduce.map.java.opts: The JVM Heap Size (0.8 times above RAM), so that JVM memory is within the container physical memory
  • mapreduce.reduce.memory.mb: The amount of memory to request from the YARN scheduler for each reduce task.
  • yarn.app.mapreduce.am.resource.mb: The amount of memory the MR AppMaster needs.

Reference:
https://hadoop.apache.org/docs/r2.7.2/hadoop-mapreduce-client/hadoop-mapreduce-client-core/mapred-default.xml

Hadoop 2.x Architecture

Addressing the limitations of the hadoop1.x, hadoop2.x is designed in a generic way so as to accommodate more than just Hadoop Mapreduce (MR V1) so that the hadoop cluster can also be used for spark, kafka, storm, and other distributed frameworks. Hadoop2.x is also referred to as as YARN – Yet Another Resource Negotiator OR MapReduce V2.

Drawing parallel between Hadoop1.x and Hadoop2.x

  • Job tracker is split into Resource Manager and Application Master
  • Task Tracker is split into Node Manager and Containers

Components of MR V2

  • Resource Manager (one per cluster): It does the job of pure scheduling, i.e, identifying the resources across the cluster and assigning them to the competing applications. It has two modules in it.
    • Scheduler: This is pluggable and we can change it based on requirement like capacity scheduler or fairness scheduler etc
    • Application Masters (plural): This is responsible for restarting the Application Master in case of its failure.

Note: Resource Manager failure itself can be handled with ZooKeeper.

  • Application Master (one per application/job): This is responsible to negotiating resources with the Resource Manager and once it gets the resources (containers inside slave nodes), it talks to the Node Managers and get the tasks executed by tracking their status and progress. The major benefits this component brings to the architecture
    • Scalability: By splitting the resource management/scheduling from application life cycle management, the cluster can be scaled much more than MR V1.
    • Generic Architecture: By moving all the application specific runtime complexities into the Application Master, we will be able to launch any type of frameworks like Kafka, Storm, Spark, etc
      Application Master also supports very generic resource model, like it can request very specific resources like amount of RAM requried, number of cores, etc
  • Node Manager (one per Slave Node): This is responsible for launching containers inside the node with the amount of resources as specified by Application Master.YARN allows applications (AM) to launch any process (unlike only java in MR V1) with
    • command to launch as process within container
    • environment variables required for the process
    • local resources required prior to launch on that node (like any 3rd party jars etc)
      security tokens (if any)
  • Container (one/many per node): This is the lowest level slave node component used to process the data.

Hadoop 2.x/YARN/MR V2 Architecture

hadoop2_arch


Application Flow

#1: Client submits job to the cluster which is received by the Resource Manager
#2: Resource Manager (RM) launches the Application Master in one of the available containers (here container #C5)
#3: On Application Master (AM) bootup, it registers itself with RM and then requests for the resources to run the job on cluster
#4: RM responds to AM with 2 containers #C1 and #C8
#5: AM then asks Node Managers (NM) of #C1 and #C8 to launch the containers
#6: Containers while running the job report back to the AM
#7: While all this process is going on Client has direct communication with AM to get the status of the job
##: Once the job is complete, AM unregisters itself from the RM and thus making the container available for other jobs

Hadoop 1.x Architecture and Drawbacks

Hadoop is built on two whitepapers published by Google, i.e,

  • HDFS
  • Map Reduce

HDFS: Hadoop Distributed File System

It is different from the normal file system in a way that the data copied on to HDFS is split into ‘n’ blocks and each block is copied on to a different node in the cluster. To achieve this we use master-slave architecture

  • HDFS Master => Name Node: Takes the client request and responsible for orchestrating the data copy across the cluster
  • HDFS Slave => Data Node: Actually saves the block of data and coordinates with its master

MapReduce: This is the processing engine and is also implemented in master-slave architecture.

  • MR Master => Job Tracker: Takes the incoming jobs, identifies the available resources across the cluster, divides the job into tasks and submits it to the cluster
  • MR Slave => Task Tracker: Actually runs the task and coordinates with its master.

Architecture

hadoop1_arch

Drawbacks

  • Design of JobTracker is done in such a way that its tightly coupled with two important responsibilities “Resource Management” and “MapReduce Task Execution”. Because of this reason the cluster cannot be used for other distributed computing technologies like Spark/Kafka/Storm/… other than Hadoop MapReduce
  • Name Node can maintain metadata of upto 4000-5000 data nodes at maximum. This will limit the cluster scalability to 4k-5k nodes
  • Hard partition of slot into Mapper and Reducer slots
  • JobTracker was a Single Point Of Failure SPOF
  • Iterative applications (Machine Learning) are very slow (10x times slower than YARN)
  • Lack of wire compatible protocols between client and sever in MapReduce applications (like hive and pig where they can support multiple versions on the same cluster)

Addressing these drawbacks hadoop 2.x is released.

Mawazo

Mostly technology with occasional sprinkling of other random thoughts

amintabar

Amir Amintabar's personal page

101 Books

Reading my way through Time Magazine's 100 Greatest Novels since 1923 (plus Ulysses)

Seek, Plunnge and more...

My words, my world...

ARRM Foundation

Do not wait for leaders; do it alone, person to person - Mother Teresa

Executive Management

An unexamined life is not worth living – Socrates

javaproffesionals

A topnotch WordPress.com site

thehandwritinganalyst

Just another WordPress.com site

coding algorithms

"An approximate answer to the right problem is worth a good deal more than an exact answer to an approximate problem." -- John Tukey

%d bloggers like this: